Call 910-776-0044

Blog

Blog Category - Building a Home

2012 Brunswick County Parade of Homes Photos

Categories: Building a Home, Jeff Satterwhite, NC Construction, Uncategorized | Posted: October 31, 2012

Thank you to everyone who came out to the 2012 Brunswick County Parade of Homes this year. It was a great success and we appreciate your attendance!

Check out some of the photos:

For questions or to learn more, contact Jeff Satterwhite: (910) 620-8883 or Jeff@gocenterline.com

Centerline Construction Chat: Grinder Pumps

Categories: Brunswick County Home Building, Building a Home, Centerline Construction Chat, Grinder Pump, Jeff Satterwhite | Posted: September 8, 2012

In this video, Jeff Satterwhite explains Grinder Pumps – what they are, how they work and how to know when yours is not working! See below for the text version.

Grinder Pumps

Grinder Pump Tub – This is 6 feet deep and as wide as the circumference of the lid. It is basically a big fiberglass bucket in the ground, and when you flush your toilet, the gray water from it runs into this bucket, underground. There is a 4-inch line running from your toilet into the tank, falling to the bottom.

There is a big huge grinder pump or a macerator that sits at the bottom of the bucket with a float, when the bucket fills to a certain level, the float flips on the switch and it grinds the material like a blender and pumps it into the street through a 2-inch line.

You need to be careful with your grinder pump, because it is like a blender in that it has a large blade and it can get clogged.

The control box
– Is a 220 volt controller that controls the grinder pump and the switches in the tank. If the red light is blinking and there is an alarm going off on the control box, then the grinder pump (macerator) is not working and the alarm float is to its max level since the grinder is not working.

If this happens, you must call the county (Brunswick County) for them to come over and take care of your problem.

For questions or to learn more, contact Jeff Satterwhite: (910) 620-8883 or Jeff@gocenterline.com

To watch other Centerline Construction Chat tutorials, click here
To see other videos from Jeff Satterwhite, click here

Centerline Construction Chat: Paver Driveways

Categories: Brunswick County Home Builder, Building a Driveway, Building a Home, Cement, Centerline Construction Chat, Construction Process | Posted: July 23, 2012

Watch Jeff Satterwhite explain what a driveway made of pavers is and the different options you have when building a paver driveway.

Paver Driveways

There are several different materials you can build a driveway with. For example, there is normal concrete like the curb, asphalt like what is in the street, then there are pavers.

The driveway in the video is a masonry paver product. The color is charcoal with a red tone. – Pavers come in different sizes and color varieties.

This particular paver has a blend of charcoal material, red burgundy material and a blend of yellow. There is a multitude of different styles and sizes between stone configurations – you can have a basket weave, Flemish bond, straight pattern – tons of different patterns to choose from. The driveway in the video is bordered with a charcoal blend. It has a nice yellow and charcoal grey color and the body of the driveway is a red blend with some charcoal color.

The base of the paver driveway is 8 inches of crushed, compacted granite – it is made of a combination of stone, sand and granite, blended together into a solid base before they are hand installed. There is a fine sand that goes between the cracks that keeps it from washing. No concrete and no bonding or mortar material keep them together and each brick is hand laid.

There are star and circle medallions in this particular driveway. There are a lot of different styles of insets that can be added to the driveways.

See other Centerline Construction Chat Videos

For questions or to learn more, contact Jeff Satterwhite: (910) 620-8883 or Jeff@gocenterline.com

Centerline Construction Chat: The Irrigation System

Categories: Backflow Preventer, Brunswick County Home Builder, Building a Home, Centerline Construction Chat, Construction Process, Irrigation, NC Construction | Posted: June 16, 2012

Learn about the Irrigation System and the Backflow Preventer from Jeff Satterwhite. In this video, he shows you all the different parts of an Irrigation system, why they’re necessary and how they work. Read details from the video below the video.

Backflow Preventer – Once water has passed through this system, the Backflow Preventer stops water from flowing back from irrigation lines into city drinking water

In this particular area of NC irrigation and drinking water comes from the same source – so in the case that the main line is cut somewhere down the stream the valve creates a siphoning effect that prevents the water  that has been in the yard or the yard lines from getting into the drinking system.

An Insulted box must go over the backflow preventer because it will freeze in the winter. Another option would be to remove (shut off) the Backflow Preventer during the colder times of year when freezing can take place.

The cost of a Backflow Preventer is around $300-400 (which is why you want to protect it during freezing temperatures)and it requires installation by someone certified. The Backflow Preventer must be inspected every year by certified inspector to make sure it is working properly.

The control valve – There are a multitude of control valves we use – we mainly use Rain Bird and Orbit. A timer can be set up in a wide variety of programs such as multiple time zones, multiple areas of sprinkling and multiple times of day. This would be for the purpose of going on vacation or hotter/colder times of year.

A dedicated line runs back to the panel so it wouldn’t get tripped off in case there is some other type of GFI trip in the house it won’t cut off irrigation.

Control valves in the box will open when you change settings. You can do a manual start and use them immediately. Spray heads are typically underground and will rise during use. This one (in the video) is a mister head – there are a variety of different heads – such as 180, 90, 360 degree heads and also heads that oscillate back and forth.

For questions or to learn more, contact Jeff Satterwhite: (910) 620-8883 or Jeff@gocenterline.com

To watch other Centerline Construction Chat tutorials, click here
To see other videos from Jeff Satterwhite, click here

Centerline Construction Chat: Simulated Stone

Categories: Brunswick County Home Builder, Building a Home, Cement, Centerline Construction Chat, Construction Process, Corner Stone, Flat Stone, Foundation, Masonry Wall, NC Construction, Simulated Stone, Wood Wall | Posted: May 14, 2012

Watch Jeff Satterwhite in the video below explain the different types of stone that are used in building and how they are used. See the text version below.

Simulated stone

2 types: Flat Stone – for flat wall, and Corner

Several manufacturers’ make the stone. – Eldorado is who makes the stone shown in the video (Owen’s Corning is a company which produces Cultured Stone)

The stone comes in a variety of different colors and styles and is made of a light weight concrete which is created in a mold. Some varieties include Ledger Stone, Field Stone and River Stone.

2 areas stone can be applied to: Masonry wall or Wood wall.

If applied to a Foundation or Masonry wall, a cement coating is put on, let to dry, then another cement coating is applied the back of the stone or to the wall, where it will be stuck to the Masonry wall.

The Corner Stones are done the same way but they go around corners, they’re put in like a puzzle on the wall or foundation.

On the Wood wall, a moisture barrier (like hydro stop) is attached to the wood wall, and a lath is used, which is nailed over moisture barrier. A base coat is then put on to dry. You apply these the same way you would on Masonry wall – Cement material is put on the back of stone with a scratch coat.

These particular stones are only good for vertical surfaces.

If you are using stones in a horizontal area, like stair treads or a porch, you would need to use a natural stone like Pennsylvania Blue Stone because the other products are not durable enough for foot traffic.

Click Here for other Centerline Construction Chat Videos

For more information or questions, go to:
www.gocenterline.com
Contact Jeff Satterwhite: (910) 620-8883 or Jeff@gocenterline.com

LED Lighting for your NC Home: What are the Benefits?

Categories: Building a Home, Construction Process, Electrical, NC Construction | Posted: February 29, 2012

LED Lighting for your Brunswick County Home

LED Lighting

How do they work?
The light-emitting diode (LED) bulb uses a semiconductor as its light source, and is currently one of the most energy-efficient and quickly developing types of bulbs for lighting your home. LEDs are recently being purchased to replace incandescent and other types of bulbs. LEDs are relatively more expensive than other types of bulbs, but are in the long-run end up being more cost-effective because they use only a fraction of the electricity of traditional lighting methods and can last far longer.

Cost: Saving Money and Energy
Many researchers and manufacturers are currently working hard to develop new and better LEDs for consumer use, and consumer prices are falling as the market grows. LEDs for the home are available in many different varieties, ranging from recessed fixtures, track lights, and traditionally shaped bulbs that can be used to replace incandescent bulbs in lamps and fixtures.

A large percentage of the energy that goes into a standard 40 Watt bulb is wasted as heat which is not good for conserving electricity and saving money. LED light bulbs generate relatively little heat as they glow, instead transferring more of their energy directly into light.

The U.S. Department of Energy estimates that rapid adoption of LED lighting over the next 20 years in the United States could save about $265 billion in energy costs and replace the construction of 40 new power plants.
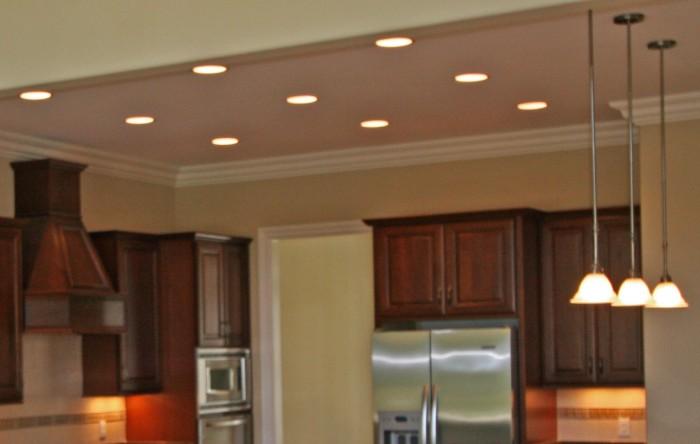
Canned LED LightsCeiling Cans
Ceiling cans (or recessed lighting) have become one of the most common styles of lighting for homes in the U.S. They are typically installed in groups simply for symmetry. Ceiling cans are an ideal place for LED light bulbs.

Other options for LED Lighting: Reading Lamps, Art Lighting, Night Lights, Outdoor Lighting, Children’s rooms: the Color Changing Party Light Bulb is particularly popular with children. It is a fun light that changes from red to blue to green at a gentle pace.

More about LED lighting
An LED light bulb can last you up to 50,000 hours. That averages out to 6 hours of light per day for 22 years. Some LED light bulbs are so energy efficient that, depending on how often you use them, they can pay for themselves in just over a year.

The best way to conserve energy is to use less of it. Most LED light bulbs are directional — which means they generally put the light out off the top of the bulb and away from the base. Incandescent bulbs, on the other hand, throw their light all over the place including toward the base — wasting electricity and generating heat. LED light bulbs run relatively cool, so they’re safer to use than fragile, burning hot halogen and incandescent bulbs. LEDs turn on instantly — a welcome difference to CFLs. LEDs do not use mercury like CFLs — so disposal concerns aren’t the same.

For more information on LED lighting for your home or any construction questions,
Contact Jeff Satterwhite: (910) 620-8883 or Jeff@gocenterline.com
or go to www.gocenterline.com

Centerline Construction Chat: Building Stairs

Categories: Building a Home, Building the Stairs, Centerline Construction Chat, Construction Process, NC Construction, Newsletter | Posted: February 28, 2012

Watch the Video below to help understand what type of parts are involved and what process goes into building the stairs in your home.

Stairs – What is involved?

Parts – Post, Tread (on side), Nosing – top of the stair that goes onto landing, Cove Molding, Baluster, Riser

Stairs can be one of the most difficult parts of the house to construct properly and make look good, so choose your carpenter wisely.

The nosing is the top piece and is normally 5 inches wide, and tread is normally anywhere from 10-12 inches wide depending on the travel of the stair. We use red oak on the tread and paint the riser white or according to trim color.

The distance of travel up the stairs can vary ¾ of an inch so it is very close on the code because it’s a trip hazard if it the treads are too far or too close together.

The post balusters (or pickets as they’re sometimes called) are drilled into the treads and placed with no more than 4 inches of gap between it and the post, or between baluster and baluster – the reason is that small child can fit their head through a space that size if they’re too far apart.

There are many choices in balusters – there are painted balusters, iron, or ornate wood and aluminum balusters. The handrail is usually an oak product or some type of painted product that matches the stairs.

For more information or questions, go to:
www.gocenterline.com
Contact Jeff Satterwhite: (910) 620-8883 or Jeff@gocenterline.com

Tankless Hot Water Heaters – What is it and why use it?

Categories: Building a Home, Construction Process, Hot Water Heater, Noritz, Noritz Tankless Water Heater, Tankless Water Heater | Posted: January 27, 2012

Tankless Hot Water Heater

The concept of the tankless hot water heater is on the rise due to the numerous benefits involved. Check out the reasons below why you might want to think about going for the Tankless opportunity as opposed to Traditional Hot Water Heaters..

Hot Water For Everyone
A tank water heater can only supply enough hot water to fill a bath tub and may have enough hot water left for a quick shower. With the tankless water heater you get endless hot water. Tankless water heaters heat water on demand, which means never having to worry about running out of hot water.

Hot Water For Any Size Home
Not only can a tankless water heater provide an endless supply of hot water, it can also deliver more of it for all your hot water needs.

Flexible Installation Options
One of the most obvious differences from traditional water heaters to the tankless water heater is its small size. Compact in design, tankless water heaters can be installed virtually anywhere; they can mount on a wall, and be inside or outside as well.

If you want ultra-fast hot water delivery, you can actually relocate the tankless heater closer to the fixtures you use most often. Therefore, a tankless heater not only saves you space, but can also save you water. Relocating a big, bulky tank to a location that makes more sense would definitely be a challenge.

Lower Water Heating Bills and Going Green
With a tankless water heater, you’ll save energy and therefore money. These systems can save about half the cost of your current water heating bill since there is no re-heating of water as with traditional water heaters. Compared to a tank water heater’s 60% efficiency, an 83%-94% energy-efficiency levels make tankless water heaters much more eco-friendly.

No More Dirty Tanks
With a tankless water heater, water is heated as it passes through the unit so you’re always using a fresh supply of water. As the years pass by, traditional tank water heaters start to rust and build-up scale inside the tank, which is where your hot water is stored for use. This is no longer a concern with the tankless water heaters.

Noritz Tankless Hot Water Heaters

For more information on Tankless Hot Water Heaters, check out the world’s most advanced manufacturers of the product, Noritz

Visit them online at www.noritz.com

For more information or questions, go to:
Contact Jeff Satterwhite: (910) 620-8883 or Jeff@gocenterline.com

Centerline Construction Chat – Interior Trim

Categories: Building a Home, Centerline Construction Chat, Construction Process, Interior Trim, NC Construction | Posted: January 27, 2012

Watch the following video to learn about Interior Trim – what it is made of, the different types, tools used to install it and more! See text version below.

Interior Trim

Interior Trim can be casing – which goes around doors and windows, baseboard – which goes around the bottom of the floor, and crown molding – which goes around the top of trey ceilings and the top of the wall, joining the wall to the ceiling.

There are a lot of options in selection of interior trim, whether your style is a contemporary, traditional, coastal or cottage – the combination of baseboard and casing creates trim that fits the style of your home. If it was a Coastal home, you would want to make sure to pick out trim that matches that style.

In the mantle shown in the video, a Poplar material, which is fluted board with an MDF material creates the beautiful outline. We build all of our custom mantles and custom bookcases, using MDF material which is a medium density fiber board and is faced with a clear Poplar. We will be building doors on this particular bookcase around the fireplace, which will create a very nice finished, custom product.

Tools of the trade – include cordless drills, air staplers and air gun nails, mini routers to put edges on particular boards and bookcases, sanders, and different types of jigsaws.

There is a lot of variety with interior trim, so choose your builder and your trim wisely, after all, it is what makes the whole package come together nicely.

For more information or questions, go to:
www.gocenterline.com
Contact Jeff Satterwhite: (910) 620-8883 or Jeff@gocenterline.com

Centerline Construction Chat: Insulation

Categories: Building a Home, Centerline Construction Chat, Construction Process, Insulation, NC Construction | Posted: December 21, 2011

Watch the following video and see Jeff Satterwhite explain what Insulation is made of and what the purpose is. Find a text description underneath the video.

Insulation

Craft Faced Insulation (paper) – The craft is glued onto an expanded fiberglass backing – very typical type of Insulation used in most construction projects

The fiberglass expands out to trap air molecules, which slows down the heat loss or heat gain in any structure.

The Craft facing gives one more layer to stop air penetration and also has a little moisture barrier on the back of it.

Insulation thickness is based on R ratings. The rating depends on how thick the fiber glass padding is. R-15 is thinner than R-19; R-30 is thicker than R-19. R value depends on energy ratings or how quickly the heat loss/gain is, which is all about the thickness of the material.

There are two sides to the insulation, the craft side and the back side. The craft side faces towards the heated area, the other side towards the cool area, because it is working as a barrier.

Sheet rock will go on top of the insulation.

Also in attic space that touches unheated space, like an upstairs loft area or bonus room that has attic space behind it, normal craft face insulation is used, backed by expanded 2-inch blue foam, which is a very dense product that is nailed and glued to the wall. This turns the insulation fating from an R-15 to a R-25, which dramatically increases energy efficiency. This fairly inexpensive product can cut heating/cooling costs greatly.

For more information or questions, go to:
www.gocenterline.com
Contact Jeff Satterwhite: (910) 620-8883 or Jeff@gocenterline.com